



SlapChop Airbrush Kit — Official Product
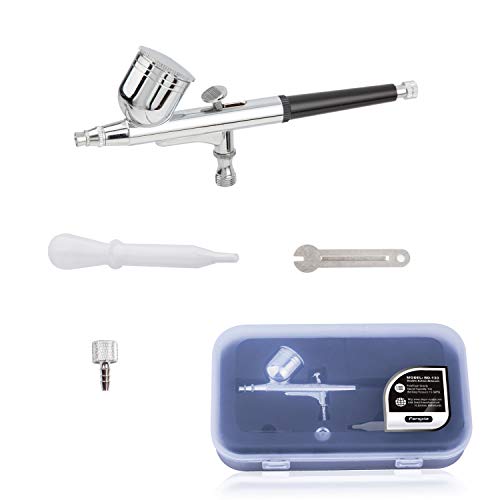
We designed the SlapChop Airbrush Kit to revolutionize how you apply base coats to your miniatures. This complete airbrush system combines precision airflow control with a gravity-feed cup optimized for the rapid highlight-and-shade technique that defines modern speed painting.
Whether you’re tackling a full army or batch-painting character models, our kit delivers consistent, smooth coverage that sets the foundation for your contrast paint layers. The dual-action trigger gives you fingertip control over both air and paint flow, letting you build up subtle gradients or lay down bold zenithal highlights with equal confidence.
What’s included in your kit
Materials & Construction
Our SlapChop airbrush features an anodized aluminum body that resists corrosion and maintains precision tolerances through thousands of painting sessions. The stainless steel needle won’t bend or corrode when exposed to thinned acrylics, ensuring your spray pattern stays consistent from your first model to your hundredth.
The gravity-feed cup is molded from chemical-resistant polymer with volume markings etched inside, so you can mix paint ratios with accuracy. We included a PTFE needle seal that creates an airtight seal without requiring excessive tightening, protecting the delicate needle tip while preventing paint backflow into the air chamber.
Technique Compatibility & Performance
Zenithal Priming
The slapchop airbrush technique starts with building tonal value through strategic highlighting. Our 0.3mm nozzle is sized specifically for this workflow—wide enough to cover batch-primed models quickly, yet precise enough to direct highlights onto raised armor plates and weapon details.
You’ll achieve smooth black-to-white gradients by adjusting your air pressure and trigger pull distance. We recommend starting at 20 PSI for your initial black primer coat, then increasing to 25 PSI when adding directional white highlights from a 45-degree angle.
Setup & Maintenance Requirements
Your SlapChop Airbrush Kit arrives ready to connect to any standard air compressor with a 1/4-inch quick-disconnect fitting. Thread the moisture trap onto your compressor outlet, attach the braided hose, and connect the airbrush body—the entire setup takes under three minutes.
After each painting session, flush the paint cup and airflow channels with airbrush cleaning solution or distilled water. Pull the needle back slightly and spray cleaner through the nozzle until the liquid runs clear. We include a set of interdental brushes sized to clean the nozzle cap and needle channel without causing scratches.
Complete Your Miniature Painting Setup


Rated 4.8 by verified buyers


Your SlapChop Airbrush Kit Questions Answered
You’ll need any hobby air compressor that delivers 15-40 PSI with a standard 1/4-inch or 1/8-inch BSP quick-disconnect fitting. We recommend a compressor with a pressure tank (at least 1-liter capacity) for consistent airflow without pulsing. Oil-less piston compressors work perfectly and run quieter than oil-lubricated models.
Most entry-level hobby compressors in the $80-150 range meet these requirements. If your compressor only has a threaded outlet, you can add a quick-disconnect adapter—we include one with our Premium Airbrush Compressor.
No, you must thin all acrylic miniature paints before airbrushing to prevent clogging the 0.3mm nozzle. Mix your paint with airbrush thinner, flow improver, or distilled water to a milk-like consistency—typically a 1:1 ratio for most brands.
Test your mixture by letting it drip off your stirring stick. It should flow in a steady stream rather than thick drops. Primers designed specifically for airbrushing (like Vallejo Surface Primer) often require less thinning than standard bottle paints.
Start by priming your model with black paint at 20-25 PSI from 6-8 inches away, using broad side-to-side strokes for even coverage. Once dry, load white or light gray paint and reduce your distance to 4-6 inches.
Hold the airbrush at a 45-degree angle above your model and apply highlights to surfaces that would catch overhead light—tops of helmets, shoulders, and raised weapon details. Build the highlight gradually with multiple light passes rather than one heavy coat. The dual-action trigger on the slapchop airbrush lets you control paint flow independently from airflow, so you can feather the edges where white transitions to black.
Immediately after finishing, empty any remaining paint from the cup and wipe it with a paper towel. Fill the cup about 1/4 full with airbrush cleaner or distilled water, then spray it through the airbrush into your cleaning station until the liquid runs clear.
Remove the needle by loosening the needle chucking nut at the rear of the airbrush and gently pulling it straight out. Wipe the needle with a cleaner-dampened cloth from back to front (never front to back, which could bend the tip). Use the included interdental brushes to clean inside the nozzle cap and paint cup threads. Reassemble and spray a final burst of cleaner to flush the air channels.
Yes, the 0.3mm needle strikes the ideal balance for miniature painting. It’s precise enough for highlighting individual armor panels and weapon details, while covering infantry-sized models quickly during base coat application. You’ll handle everything from 28mm tabletop miniatures to larger vehicle models with this single needle size.
If you later want to specialize, our 0.2mm needle excels at extremely fine edge highlighting and facial details, while the 0.5mm needle accelerates terrain and large vehicle priming. Most painters find the 0.3mm setup handles 90% of their airbrushing needs.
Absolutely—the slapchop airbrush handles Citadel Contrast Paints beautifully when properly thinned. Mix your Contrast paint with Contrast Medium at a 2:1 or 3:1 ratio (paint to medium) depending on how transparent you want the layer. Apply it at 18-22 PSI over your zenithal-primed model.
The pre-shaded highlights you create with the airbrush will show through the translucent Contrast paint, giving you instant depth and shadow definition. This is the core of the slapchop technique—building value with the airbrush, then adding color with Contrast paints in a fraction of the time traditional layering requires.
For priming and base coating, set your pressure regulator to 20-25 PSI and maintain a 6-8 inch distance from your model. This gives you fast coverage with minimal overspray. When applying zenithal highlights, increase to 25-30 PSI but move closer (4-6 inches) for more concentrated coverage on raised details.
For fine detail work and edge highlighting with thinned regular paints, reduce pressure to 15-18 PSI and work 3-4 inches from your target. Lower pressure gives you more control and reduces the risk of paint pooling in recessed areas. Always test your spray pattern on scrap material when changing pressure or paint types.